Image Map

Sunday, January 15, 2017

100th Day Prep

It's just about that time - the 100th Day of School!

I've been pregnant this entire school year, which all you Kindergarten teachers know, can be quite the feat at the beginning of the year AND your pregnancy.  Making it to the 100th day is an accomplishment this year for both me and my Kinders!


I just got back from break and started going through the plans my team has had in the past and started thinking about how I wanted to celebrate this year.  I have always used the coloring crowns from Oriental Trading and plan do to so again.

In years past, my kiddos have absolutly LOVED the 100th Day posters, but this year we're going to try something a little different to go with our 100 years old theme for the day.  Which, by the way is the most hilarious day in Kindergarten.

I also have some fun STEM and measurement activitiy up my sleeve for this year.  I'm planning of using these feet to measure our hallways.  We're going to lay out some butcher paper on the floor and use the feet to measure out a ten foot section.  This will be one section of our big ruler. Then, we will repeat the process until we have 10, ten foot sections.  After we gather up all our sections, out to the halls we will go to tape the big rulers down and measure out 100 feet!  I CANNOT wait to show you what it looks like - the kids are going to be so excited!


My kids are also going to use this set, and add on with some of my own marbles, to make a line of 100 standing dominos. I'll have 10 differently colored mat set out so my kids can count out 100 dominos by placing 10 on each mat.  Then they are going to have a blast lining them up and building a structure to run marbles down and watch the dominos fall. Marbles are a class favorite, but I have never added the domino component, so I am so excited to see how they explore the materials, what they build and the eruption of cheers that come!


What are you planning for the 100th day? Check back to see how it all goes down and what other fun activities we have planned.

Oriental Trading provided me with the aforementioned materials in exchange for sharing how I use their materials. Looking for a deal at Oriental Trading? Visit their coupon page for the latest in sales!


Monday, December 12, 2016

D100 Launch!


"There's a power in problem-solving and experimenting and taking things from questions to ideas to authentic products that you launch into the world" (Spencer & Julian).

Their innate ability to imagine, believe, create, learn, and create teaches us many things, so why don't we grow those abilities? Why don't we let our kids LAUNCH themselves?

The D100 book study has been diving into design thinking with our Launch (John Spencer and A.J. Juliani) book study, so in case you missed some of the previous weeks, just hover your mouse over this graphic, click, and get caught up!


As for this week, we are diving into Phase 4 of the LAUNCH cycle: Navigating Ideas.  In order to get to phase four, students need to have a rock solid understanding of all the information surrounding the problem they want to solve so that they can figure out the next steps. This is the planning phase. Taking it from broad to specific and managable. 

Ideas > Problem > Reseach > Info > Plan .... Create > LAUNCH!

Launch has these for brainstorming:
  1. Kids brainstorm isolation FIRST to avoid group think, then in group/s. 
  2. There are NO dumb ideas!
  3. Round robin brainstorming so everyone gets a chance, document ideas.
  4. Be clear in the specific topic 
  5. Be intentional about the space so all participants are present, have norms.
  6. Have breaks for reflection
  7. Have a leader to document ideas
  8. Rotate groups so all ideas are heard
  9. Have multiple visuals
  10. NO timers! Let it be organic!


We want our kids to be divergent thinkers in these brainstorm sessions - meaning they think of options and and solutions in a different way.  They present challenges and questions and find connections where they make not be apparent. 
You know that quote? "Well behaved women rarely make history?" Divergent thinkers make history, they swim upstream and don't always follow the directions - they think for themselves. Which is EXACTLY what we want in design thinking!

Don't get me wrong, we want teammates and powerful, well run partnerships. But, innovation requires thinking OUTSIDE the box!

After a really great brainstorm, next up is: Choosing an Idea

It's time to evaulate which brainstorming ideas would work and why - narrowing the ideas down.
First, students need to add details - where are the holes in the original potential ideas? Next, students need to consolidate ideas.  In the third step, students will have to establish a criteria under which thier ideas will work. Then they will narrow down the best ideas, and last choose an idea!

Once an idea is settled our our little creators will want to start making, building, and creating - but wait! Before anything is made, we need to make sure we have all the PARTS:
The PARTS framework is essential in the LAUNCH process. 

"When students and teachers collaborate to navigate ideas, the product becomes much more than one person's accomplishment. This togetherness takes group work to a new level and when an idea successful, the experience is meaningful to everyone involved" (Spencer & Julian).
All our students are natural creators, but using the LAUNCH process and ideas presented in the book, we can help bring out the individuality of each of our students to create products, solve problems, and be change makers in our world.  Let's facilitate meaning-making and empower our students to think deeper, and LAUNCH further!

Next up in the our #Launchbook study, Miss G Does 5th will be diving into the creating process. Check our #D100BloggerPD for more!

Tuesday, September 6, 2016

Goldie Blox Coding for Girls

Coding and 1:1 technology in the classroom go hand in hand. There is even an event for coding called the Hour of Code. Last year, was the first year I got my Kinders into coding with both the Scratch Jr. and Lightbot apps. We even documented our coding on a FREE Hour of Code log.

The boys LOVED Lightbot and Scratch, but my girls weren't so into it.  Everyone loved Puzzlets (read more here), but I just couldn't get my girls to actively CHOOSE a coding game on the iPad.

http://www.goldieblox.com/

Then I found Goldie Blox...

First I thought it was just an app, but they have a whole slew of toys inspiring girl engineers. 


The app is called the Rocket Cupcake and it is TOTALLY girly.


Kids start out with simple coding. They drag and drop arrows to get the avatar to move. Each level increases with difficulty, adding a step of code each time.


There is also the Sandbox area where kids can explore and solve more advanced coding puzzles.


As much as I would love to buy a set of toys for the classroom, we'll only be able to use the app. I CANNOT wait so show my old Kinders and introduce it to the new class when they are ready. 

If you haven't tried coding with kids before you should.  Many of the coding toys and apps teach sequential steps - "If I put a left facing arrow, my avatar will move left."

I usually play the coding game with a whole group and project it onto the SMART Board. They get to tell me what to do and we see if it works - trial and error.

A few years ago NONE of this stuff was available to the classroom, much less appropriate for five and six year olds. Now, however, you can access coding with one app and really dive deep into some higher level processing!

What coding toys and apps do you use in your class? What am I missing out on?!

Tuesday, August 23, 2016

Oriental Trading Summer Stock Up

When Jill from Chevron and Centers let me know that Oriental Trading was looking to support some teachers this summer, she didn't have to ask twice to get me on board!


There are SO many things from Oriental Trading to use in your classroom. I was actually really surprised, in a good way, that they had so much! OT has definitely focused on education lately it looks like.

After narrowing by $400 cart down to under $100, here's what I had to grab for the new year:

Letter Bean Bags


I have been wanting these for YEARS but I am frugal and can never spend over like $10 on one thing for my room. But I am so glad that I FINALLY got my hands on these! There are a million ways to use these fun, kinesthetic toys to teach letters.


I pulled out my chalkboard table cloth and some chalk and made a toss game.  Students grab a bean bag and have to toss it right right so that it lands on the corresponding letter.


Money Math


This is a fun center game to help students develop number sense.  Numbers to 20 are included, with the numeral represented by the number word, number, dice, and tallys. Students link together the matching monkeys to prove their number sense!


And isn't this link nice?


It's a little different, and I think easier for my little ones!

Transportation Manipulatives and Going Buggy Tongs


Counters are a Kindergartner's best friend and I usually pick them up in the dollar spot.  I am always scouting for counters to engage my boys and these are PERFECT!  I am sure the intent of the tongs is not to pick up manipulatives, but I use it as an option for my students when they are working in math. You could also use them for a dice shaker!


Dry Erase Crayons
Who doesn't love a class set of crayons? Better yet - dry erase crayons! I haven't debuted them yet but I know my Kinders will LOVE these crayons as an alternative to our black Expos.


What have you used from Oriental Trading in your classroom? Have any ideas for me to use these materials differently?


Oriental Trading provided me with the aforementioned materials in exchange for sharing how I use their materials. Looking for a deal at Oriental Trading? Visit their coupon page for the latest in sales!

Tuesday, August 16, 2016

Hair Gel Letters

Little ones love all things gooey. 

I love tactile letter practice. 

https://www.teacherspayteachers.com/Product/Letter-cards-for-centers-2687616

Put them together and you get hair gel letters. So easy.  

I got all my supplies from the Dollar Store and paired the center with letter cards that match my classroom decor because I am OCD like that. 

https://www.teacherspayteachers.com/Product/Letter-cards-for-centers-2687616

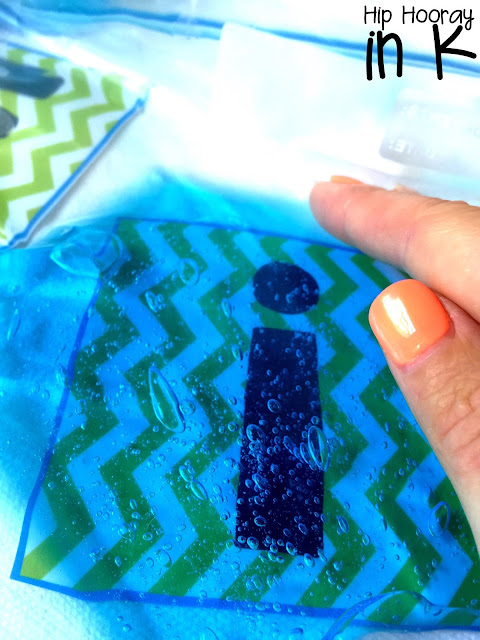
All you need is a bottle or two or hair gel (I chose blue because it also matches my classroom decor - so annoying right?), large plastic bags, and letter flash cards. 

Open the bag, and squeeze enough hair gel in the cover the size of the card that you are going to use.  Zipper the bag closed - because we all know what will happen if its not.

https://www.teacherspayteachers.com/Product/Letter-cards-for-centers-2687616 

Then place one of the flash cards on the table and put the bag over the flash card.  Smooth out the gel so it covers the card.

https://www.teacherspayteachers.com/Product/Letter-cards-for-centers-2687616

Then trace! My kiddos love the feel of the gel moving under their fingers, and work spaces can stay clean!

https://www.teacherspayteachers.com/Product/Letter-cards-for-centers-2687616


When you are done tracing, switch cards and play again! Chevron letter cards are here for FREE!

If you are like me and like to have your kiddos use response sheets in your center, print off these babies and put in a clear write and wipe pocket or let each kiddos choose her/his own.

Besides gel, we also use shaving cream or soap in these bags. What do you like to do tactile letter practice with?


Saturday, August 6, 2016

Gel Beads

Have you tried boba? Or bubble tea? I have not, but I've seen it...and the boba look and feel exactly like these gel beads which are SO. MUCH. FUN!

I was a little skeptical when I found these gel beads at the dollar store, but being one $1 I gave them a try. Now I can't stop finding new uses for them. And I hope you don't live by me because I bought out the stock of them at my Dollar Tree.  

I talked a little about how I use them in sensory centers but I had to go into more depth!
http://hiphoorayink.blogspot.com/2016/08/sensory-centers.html

All you need to do is empty the packet of gel beads into a bowl of water and let it sit a few hours. Empty out the excess water and you're ready to play. One packet makes about 4-5 cups of gel beads. I have had mine about a week and they haven't dried out yet!

And then I just went to town putting them in centers for my kids. 


Throw the gel beads in a plastic container with some magnetic letters and let your kiddos go to town.  Mine use a response sheet to color the corresponding letter after they find a letter.

https://www.teacherspayteachers.com/Product/Letter-Response-Sheets-2692585

If you have any laminated task cards you can throw those in too! Just make sure that The gel beads are soaking or the cards will get soaked.  I put in some alphabet QR codes. The kids just find the card on the bottom of the bowl, pull it out and scan the QR. Then a video of corresponding letter to the picture on the card comes up. More on A to Z QRs here.

https://www.teacherspayteachers.com/Product/A-to-Z-QRs-2283221 

In my Dollar Tree shopping spree, I picked up some glass stones and write sight words on them. Putting the stones in the bowl of gel beads if a fun little sensory activity.

http://hiphoorayink.blogspot.com/2016/08/sensory-centers.html


Again, I have my kids record their sight words as they find them. Here's the recording sheet I use.

https://www.teacherspayteachers.com/Product/Sight-Word-Response-Sheet-FREEBIE-2692788


http://hiphoorayink.blogspot.com/2016/08/sensory-centers.html

I haven't tried this one yet, but I think the gel beads would be awesome for a measuring center. Or to explore the movement of water.  Measuring spoons can be used to scoop and move water and explore capacity.

http://hiphoorayink.blogspot.com/2016/08/sensory-centers.html


Measuring spoons are also a good fine motor challenge in trying to get gel beads from place to place. Here is another way to explore capacity.


I am really excited to try this non-standard measuring center with my kiddos early in the year.  It really covers a lot (fine motor, measurement, sensory, fun) and helps develop prior knowledge for when we dive deep into measurement!

So I HAVE to know, what am I missing? What else could we use these gel beads for?!


Friday, August 5, 2016

Digital Danielson Documentation

If your district does Danielson, then you know about documentation. 

https://www.teacherspayteachers.com/Product/Danielson-Documentation-Evidence-Organization-Portfolio-for-Teachers-1121004

Keeping all your parent letters, lesson plans, student work, professional duties notes, and everything else happening in your classroom organized can be difficult. Then there is the issue of sharing it all with your administrator.

In this digital age, why not just keep it on your computer and share it that way? I for one have never been a fan of accumulating stuff. I rather take a picture, put it in a file and keep it tucked away.

In order to organize all the evidence needed for Danielson, I started keeping everything in a set of file folders on my desktop. Each file folder in this system in labeled with what you should put in it (see picture 3). That makes it easy for you to stop guessing which documentation fits where.


https://www.teacherspayteachers.com/Product/Danielson-Documentation-Evidence-Organization-Portfolio-for-Teachers-1121004

When I save my newsletters, I drag and drop it into one of the folders. Then I have classroom environment evidence saved from something I am going to be doing anyway. Done.

When it is time to share your Danielson documentation with an administrator, simply give them the folders on a flash drive or upload it all to Google Drive.

That is where I keep all my files. 

Once it is in Google Drive you can access from anywhere and save files from anywhere too!

 https://www.teacherspayteachers.com/Product/Danielson-Documentation-Evidence-Organization-Portfolio-for-Teachers-1121004

You can even download Google Drive to your desktop and drag your Danielson documentation there, then share with an administrator!


https://www.teacherspayteachers.com/Product/Danielson-Documentation-Evidence-Organization-Portfolio-for-Teachers-1121004

This is seriously the easiest way to keep your files safe, organize your digital evidence and be able to share it with administrators. Then again, I REALLY love Google Drive... it's just so easy to use once you get started! Get your own set of files here!

How are you storing your documentation now? Has a system like this worked for you?